Pages

Friday, September 25, 2015

Outdoor Dining

Welcome Fall!  It's my absolute favorite time of the year, as I'm sure you know by now! The weather is slowly turning cooler around here and it's so nice to be outside enjoying it.  All summer long, we've been working hard to get our back deck in shape, as well as our yard and the patio underneath the deck.  Tim sanded and stained our deck and I painted the rails white.  We love the difference this has made!  It was such a large undertaking and it took quite a bit longer than we had anticipated, but we are so glad we did it.  We're still not quite finished,  but we're finally at a point where the hardest part is done and we can relax and enjoy it.


Max and I spend most mornings out here sipping coffee and watching the birds.

The small table is perfect for our family of five when want to eat outside, but it's really not large enough when we are hosting guests.


So we decided to make better use of the space underneath our deck and turn it into an outside dining area.  Tim took an old work table and made it into a farmhouse style table.  Then we hung up strings of lights to give the space a nice ambience. 


Over the past year, we've also been removing unwanted plants and bushes that were scattered throughout our back yard and have planted grass in their place.  We've found that we really enjoy having friends and neighbors over for a casual dinner out back or s'mores around the fire pit.  And it's nice to have a yard for the kids to run around and play games, while the grownups talk. 


Last weekend, Tim got a smoker, which we are so excited about.  Now we can smoke large cuts of meat like ribs, brisket and pork loins.  We are looking forward to weekends spent smoking meat, inviting friends over to share our meals with, and making memories out back.  So fun!


Tuesday, September 15, 2015

Closet turned Art Space

Remember my new table?


Well, since I love it so much, and although I don't mind if it gets normal wear and tear from eating on it, I don't exactly want my kids doing art projects on it.  I want to keep markers, paint, and glitter glue as far away as possible.  But I love that my kids do art, so I knew I needed to figure out a way to still have an art space in our home.  One night around 3:30a.m., as I was laying wide awake after one of the kids had woken me up from a nice sound sleep, I was brainstorming what to do about this dilemma.  I actually love figuring out ways to make the spaces in our home work extra hard for us.  Our house is not large, the bedrooms are on the smaller side, and every inch counts.  I knew there was a lot of wasted space in Peyton's closet and it was not being used to it's full capacity.  She is also the one who does the most art, so it made the most sense to me to convert her closet into an art space.   

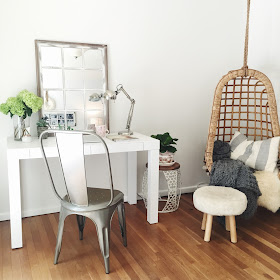
My original idea was that Tim would build a desk into the closet, but then we decided that it would be easiest and quickest to buy a desk and just put it in there.  Then we measured my desk (below) and realized that it actually fit perfectly.  


So rather than buying a new desk for her that would get covered in messy art projects, we decided to give her my old desk and get an update for me.  Although you can't see it in the pictures, there are spots that are less shiny and even a bit splotchy from when I spray painted it white a year ago (it used to be yellow). 


We found this cute Josephine desk on sale at World Market for me.   


I love the X for the legs.  It gives it a little more style and sophistication than my simple parsons desk.  It's definitely an upgrade.


Here is the before picture of Peyton's closet (after we removed everything)


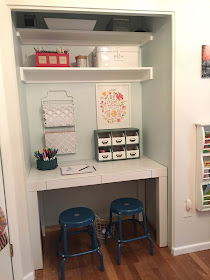
And here's the after picture:


We painted the inside a soft shade of blue so that it would stand out from her gray walls.  Getting that desk in there was quite the wrestling match, but Tim squished and squeezed and pounded it in there.  Since it fits so snugly, it kind of looks like a built in. Then I made a list of everything we needed to store and organize (crayons, markers, stamps, paper, glitter glue, play doh, watercolor paints, brushes, etc…) and I hit up Marshalls and Ikea.  

If you're wondering what we did with all her clothes, everything fit into her dresser, except for a few nicer dresses that I hung up in our closet.  And the kids keep their shoes either on a shelf in the garage right outside our kitchen door or under their beds. This arrangement may not work forever, but that's okay.  It won't be a big deal to pull the desk out and convert it back into a closet if the day comes where we feel that that would be the best use of the space.  For the time being though, this is just what we need. 


Monday, September 14, 2015

Chocolate Chip Peanut Butter Balls

Hi there!

I just wanted to pop in today and share a quick recipe with you guys.  I do hope to be back in this space more often.  All my kiddos are in school these days, so I want to get back to blogging more.  I miss it.

You may have already seen these Peanut Butter Balls on Pinterest, but if not, I wanted to share the recipe with you.  It's one of our favorite snacks around here.  I will warn you that they are very addicting though and you won't want to stop eating them.  I started making them two years ago and haven't stopped yet.  As soon as we run out, I find myself making another batch.


A few weeks ago, I mentioned these to a friend and she accused me of holding out on her for all this time.  So I apologize because I've been holding out on all of you guys too. But I'm here to share the recipe with you today... so better late than never!!

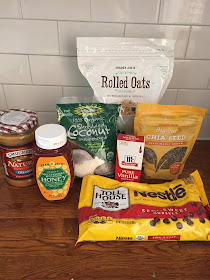
The recipe is super simple:

1 cup oatmeal
1 cup shredded coconut (I buy unsweetened)
1 cup Peanut Butter
1/3 cup honey
1/4 cup chocolate chips (I actually never measure these, I just dump some in)
1 tsp vanilla
1 tsp chia seeds (this is optional and you can also use flax seeds or something else you want to sneak in to the mix)


I try to buy good quality, pure ingredients so that they are as healthy as possible and I can feel good about letting my kids eat these.  

Basically, you just measure everything out and mix it all up in a bowl.  And this is where you must show some restraint because you will end up wanting to eat the entire bowl.  


Then you roll them into balls for easy snacks.  Put them in a sealable container and keep them in the refrigerator. We like them best when they're cold. 


Super simple.  Plus it's healthy.  And they're delicious too.  


Hope you like them!