One of the things our kitchen is lacking is storage space. There’s no pantry and very limited cabinet space. So as we’ve been planning out our renovation and thinking of ways to make the space that we have more efficient for our family, one of the things we wanted to do was add some additional cabinetry along an unused portion of the wall in the eat-in area of the kitchen.
We originally planned for it to look something like this picture below and then we wanted to add some open shelves up above the cabinets.
 The extra cabinets would give us a place to store snacks as well as a convenient place to keep art and school supplies for the kids (since the kitchen table tends to be the spot where homework and art projects are done). I also planned to move my Keurig over to that area and use it as a coffee bar, which would then free up counter space in other parts of the kitchen.
But over the weekend, we came across this vintage sideboard/buffet listed on Craigslist and I knew it would be perfect for our kitchen. And at $145, it was several hundred dollars cheaper than buying the extra cabinets.
(This picture was taken after we sanded it down.)
The extra cabinets would give us a place to store snacks as well as a convenient place to keep art and school supplies for the kids (since the kitchen table tends to be the spot where homework and art projects are done). I also planned to move my Keurig over to that area and use it as a coffee bar, which would then free up counter space in other parts of the kitchen.
But over the weekend, we came across this vintage sideboard/buffet listed on Craigslist and I knew it would be perfect for our kitchen. And at $145, it was several hundred dollars cheaper than buying the extra cabinets.
(This picture was taken after we sanded it down.)
 I loved that it had both drawers and cabinets. And it was just the right size for the spot we needed it to go in. Sometimes God just drops the most unexpected blessings in our laps.
A quick side note: I tried living with the red bricks in the kitchen for as long as I could stand them, but I just couldn’t do it.
Here’s a reminder picture for you of what we started with.
I loved that it had both drawers and cabinets. And it was just the right size for the spot we needed it to go in. Sometimes God just drops the most unexpected blessings in our laps.
A quick side note: I tried living with the red bricks in the kitchen for as long as I could stand them, but I just couldn’t do it.
Here’s a reminder picture for you of what we started with.
 All the dark red bricks just sucked the light right out of every inch of the kitchen. Not to mention, red bricks just don’t fit with the vision I have in my head for my light, bright, white kitchen. I tried giving the bricks a light gray wash to tone them down, but still wasn’t happy with the result. I kept doing white washes on the bricks until I could look at them and be happy. I stopped when they were white. Apparently, white bricks make me happy.
Back to my new buffet…
Usually, when it comes to painting furniture, I go with the “safe” colors. But I knew right away that I wanted to do something bold with this piece. I wanted it to make a statement; to be a fun, slightly unexpected, pop of color in our hopefully soon-to-be white kitchen.
Picking the deepest shade of teal on the color swatch felt a little bit risky to me (like I said, it’s not my usual thing), but I went with my gut and I am so in love with the end result. The color is Behr’s “Tuscan Teal”.
All the dark red bricks just sucked the light right out of every inch of the kitchen. Not to mention, red bricks just don’t fit with the vision I have in my head for my light, bright, white kitchen. I tried giving the bricks a light gray wash to tone them down, but still wasn’t happy with the result. I kept doing white washes on the bricks until I could look at them and be happy. I stopped when they were white. Apparently, white bricks make me happy.
Back to my new buffet…
Usually, when it comes to painting furniture, I go with the “safe” colors. But I knew right away that I wanted to do something bold with this piece. I wanted it to make a statement; to be a fun, slightly unexpected, pop of color in our hopefully soon-to-be white kitchen.
Picking the deepest shade of teal on the color swatch felt a little bit risky to me (like I said, it’s not my usual thing), but I went with my gut and I am so in love with the end result. The color is Behr’s “Tuscan Teal”.
 The finish on the top of the buffet was chipping and peeling when we bought it, so we ended up needing to sand it all the way down to the wood. I decided to just take that as an opportunity to mix things up a little bit and stain the top instead of just painting it all the same color. I like the contrast and I think the dark wood goes really well with the teal.
Here’s a peek inside the cabinets and drawers.
The finish on the top of the buffet was chipping and peeling when we bought it, so we ended up needing to sand it all the way down to the wood. I decided to just take that as an opportunity to mix things up a little bit and stain the top instead of just painting it all the same color. I like the contrast and I think the dark wood goes really well with the teal.
Here’s a peek inside the cabinets and drawers.


 Last night, Tim figured out how to hang my shelves up for me. (Since they were going up on brick, it was a little more difficult.) These shelves were from our art room at our previous house. I just put a couple coats of primer and white paint on them to freshen them up.
 And this morning, I had some time to play around with the arrangement of everything.


 Coffee, anyone? Come over and have a cup of cheer with me!
 I really love the way it all turned out. It’s so different than the original plan that we had, but I like this so much better. I go in my kitchen just to stare at it.

Updated Pictures:
I linked up with:


 To make a long story short, Tim and I realized over the weekend (after attempting to demolish our linoleum floors) that completely overhauling the kitchen from floors to cabinets was way beyond our DIY skill level. I’m not sure we could handle living in a demolition/construction zone for weeks (or maybe even months) while we try to renovate on weekends and in the evenings. Not to mention, there’s three kids in the mix. And I don’t do well with unorganized chaos for very long.
So now, we’re considering hiring a company that will pretty much do everything for us. In the end, I don’t know if we will go with this particular company or someone else, but either way, I’m trying to settle on my kitchen design so that we can move forward in this process. I’m tired of living in the disaster that is my kitchen right now. (see photos above)
So lets talk kitchen details today, okay?!
You probably already know this by now, but my must haves are white shaker style cabinets, butcher block countertops, farmhouse sink, open or glass cabinets, and white subway tile backsplash.
Here’s a little visual of what I like.
To make a long story short, Tim and I realized over the weekend (after attempting to demolish our linoleum floors) that completely overhauling the kitchen from floors to cabinets was way beyond our DIY skill level. I’m not sure we could handle living in a demolition/construction zone for weeks (or maybe even months) while we try to renovate on weekends and in the evenings. Not to mention, there’s three kids in the mix. And I don’t do well with unorganized chaos for very long.
So now, we’re considering hiring a company that will pretty much do everything for us. In the end, I don’t know if we will go with this particular company or someone else, but either way, I’m trying to settle on my kitchen design so that we can move forward in this process. I’m tired of living in the disaster that is my kitchen right now. (see photos above)
So lets talk kitchen details today, okay?!
You probably already know this by now, but my must haves are white shaker style cabinets, butcher block countertops, farmhouse sink, open or glass cabinets, and white subway tile backsplash.
Here’s a little visual of what I like.
 via here
Although I know the style of kitchen I want, the process of designing the actual kitchen, like how many cabinets and how many drawers and what sizes they will be and which cabinets should be glass or open and where exactly the appliances will go and how it will all fit together and be efficient and still give me the look and feel that I want is the part I’m kinda stressing over.
I’m working with a galley kitchen. The sink is on one side of the kitchen and the oven and fridge are on the other. There is not a lot of space to work with, so everything needs to be very functional and efficient.
With the help of a kitchen designer, this is the basic layout we’ve come up with for the sink side:
(I don’t know why the crown molding is black in the picture, but just ignore that. I also don’t want anything that fancy up there.)
via here
Although I know the style of kitchen I want, the process of designing the actual kitchen, like how many cabinets and how many drawers and what sizes they will be and which cabinets should be glass or open and where exactly the appliances will go and how it will all fit together and be efficient and still give me the look and feel that I want is the part I’m kinda stressing over.
I’m working with a galley kitchen. The sink is on one side of the kitchen and the oven and fridge are on the other. There is not a lot of space to work with, so everything needs to be very functional and efficient.
With the help of a kitchen designer, this is the basic layout we’ve come up with for the sink side:
(I don’t know why the crown molding is black in the picture, but just ignore that. I also don’t want anything that fancy up there.)
 Up top, I wanted some closed cabinets, some glass cabinets, and some completely open shelves (cabinet doors will just be taken off). I also wanted it to be symmetrical looking. For the bottom, the farmhouse sink will go in the open space. And instead of getting all cabinets with doors down below, I’ve decided on extra drawers. And we moved the dishwasher from the left side of my sink to the right side, since I am right handed and it’s just easier that way.
Now we all know that I want a farmhouse sink, but I have been debating between the Ikea double bowl sink or the single bowl sink.
The Domsjo double bowl is 36” wide and 9” high
Up top, I wanted some closed cabinets, some glass cabinets, and some completely open shelves (cabinet doors will just be taken off). I also wanted it to be symmetrical looking. For the bottom, the farmhouse sink will go in the open space. And instead of getting all cabinets with doors down below, I’ve decided on extra drawers. And we moved the dishwasher from the left side of my sink to the right side, since I am right handed and it’s just easier that way.
Now we all know that I want a farmhouse sink, but I have been debating between the Ikea double bowl sink or the single bowl sink.
The Domsjo double bowl is 36” wide and 9” high
 The Domsjo single bowl is 25” wide and 7” high
 What do y’all think? Do any of you have a Ikea farmhouse sink? If so, which one and do you like it?
Even if you don’t have a farmhouse sink, do you think one big sink is best (like for washing big pots) or two smaller sinks (one to thaw meet or soak dishes in while still being able to use the other side)? I'm leaning towards the double sink right now, because it’s what we had in our last house and I found both sinks to be useful, but I would love to hear your thoughts. I also don’t have a ton of counter space, so if I opt for the bigger sink, then it means even less counter space.
Across from the sink side, is the range and refrigerator.
The first layout we designed looked like this:
(Again, dismiss the black crown molding.)
What do y’all think? Do any of you have a Ikea farmhouse sink? If so, which one and do you like it?
Even if you don’t have a farmhouse sink, do you think one big sink is best (like for washing big pots) or two smaller sinks (one to thaw meet or soak dishes in while still being able to use the other side)? I'm leaning towards the double sink right now, because it’s what we had in our last house and I found both sinks to be useful, but I would love to hear your thoughts. I also don’t have a ton of counter space, so if I opt for the bigger sink, then it means even less counter space.
Across from the sink side, is the range and refrigerator.
The first layout we designed looked like this:
(Again, dismiss the black crown molding.)
 The main thing we’re working around here is the Praktfull Pro 36” gas range.
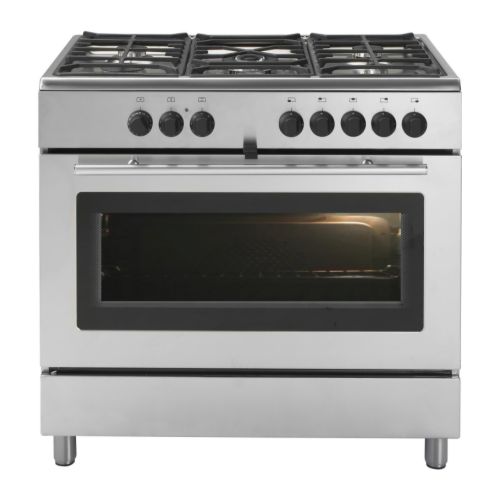 Most ranges are only 30”, so this one will take up more space, but I love it so we’re trying to make it work. It still leaves me with 21” cabinet space on each side of the range, so hopefully there will be enough storage and counter space.
The problem I keep bumping into, is where to put the microwave. My first choice would not be over the range. I really like the look of a nice range with a hood over it, so I was trying not to put the microwave there.
Like this
Most ranges are only 30”, so this one will take up more space, but I love it so we’re trying to make it work. It still leaves me with 21” cabinet space on each side of the range, so hopefully there will be enough storage and counter space.
The problem I keep bumping into, is where to put the microwave. My first choice would not be over the range. I really like the look of a nice range with a hood over it, so I was trying not to put the microwave there.
Like this
 via here
Plus over the range microwaves are typically 30”, so we’d need a trim kit to make it fit with our 36” range and I’m just not sure how that would look.
Here’s another option that we (with the help of our designer) worked up
via here
Plus over the range microwaves are typically 30”, so we’d need a trim kit to make it fit with our 36” range and I’m just not sure how that would look.
Here’s another option that we (with the help of our designer) worked up
 In this layout, we scooted the range over 9” to the left and put the microwave in an open cabinet. This also gives me a small cabinet for cookie sheets, muffin pans, etc, down below, which I really want. But with the microwave so close to the range, I almost think what’s the point, lets just put it over the range. Ya know?
I would love it to be tucked away nicely like this one below, but I’m having a hard time figuring out how to do that in my kitchen. If I put it on the sink side, it totally messes up the symmetricalness of all the cabinets over there.
In this layout, we scooted the range over 9” to the left and put the microwave in an open cabinet. This also gives me a small cabinet for cookie sheets, muffin pans, etc, down below, which I really want. But with the microwave so close to the range, I almost think what’s the point, lets just put it over the range. Ya know?
I would love it to be tucked away nicely like this one below, but I’m having a hard time figuring out how to do that in my kitchen. If I put it on the sink side, it totally messes up the symmetricalness of all the cabinets over there.
 via here
What do you think… microwave over the range or somewhere else? Would it look weird over a 36” range? I kinda think it would take away from the look of the range w/the hood, but maybe not. What do you think? I almost feel like I have no other choice.
Moving on… one major problem with our kitchen right now is that there is no pantry. We have some extra wall space in the eat-in kitchen area where we’re planning to add some additional cabinets with drawers. This would give us a place to keep snacks and other pantry items. (That space between the refrigerator and the extra cabinets is a door into the garage.)
via here
What do you think… microwave over the range or somewhere else? Would it look weird over a 36” range? I kinda think it would take away from the look of the range w/the hood, but maybe not. What do you think? I almost feel like I have no other choice.
Moving on… one major problem with our kitchen right now is that there is no pantry. We have some extra wall space in the eat-in kitchen area where we’re planning to add some additional cabinets with drawers. This would give us a place to keep snacks and other pantry items. (That space between the refrigerator and the extra cabinets is a door into the garage.)
 My idea is to add some open shelves up above those cabinets and store glass canisters with snacks, crackers, cereal, etc… I also plan to put our Keurig on top of those cabinets, so it will be like a little coffee area with coffee mugs, k-cups, sugar etc.. I’ve thought about just putting a smaller counter top microwave over there, but I’m not sure if I want to take away the extra counter space.
What to do??
Alrighty, please offer all your opinions, suggestions, advice, tips, or ideas for me. Especially if you’ve ever renovated a kitchen, is there anything you would definitely do differently if you had to do it all over again or anything that you would make sure to do again because you love it so much?
I’m all ears!
My idea is to add some open shelves up above those cabinets and store glass canisters with snacks, crackers, cereal, etc… I also plan to put our Keurig on top of those cabinets, so it will be like a little coffee area with coffee mugs, k-cups, sugar etc.. I’ve thought about just putting a smaller counter top microwave over there, but I’m not sure if I want to take away the extra counter space.
What to do??
Alrighty, please offer all your opinions, suggestions, advice, tips, or ideas for me. Especially if you’ve ever renovated a kitchen, is there anything you would definitely do differently if you had to do it all over again or anything that you would make sure to do again because you love it so much?
I’m all ears!
By now, you probably know about my love for fireplaces. In our previous house, we didn’t have a fireplace, so I made a faux fireplace to help me survive without a real one. I even got an electric fireplace to put in front of my faux mantel so it felt even more authentic.
 Back when we were house hunting for this house, a fireplace was pretty much a non-negotiable item for me. If a house didn’t have a fireplace, I really didn’t even consider it. And preferably, I wanted the fireplace to be a brick wood-burning fireplace so that I could paint the bricks white once we moved in. I love painted white brick fireplaces and I love real crackling, cozy fires.
Well, about a month ago, I finally got my brick wood-burning fireplace.
Back when we were house hunting for this house, a fireplace was pretty much a non-negotiable item for me. If a house didn’t have a fireplace, I really didn’t even consider it. And preferably, I wanted the fireplace to be a brick wood-burning fireplace so that I could paint the bricks white once we moved in. I love painted white brick fireplaces and I love real crackling, cozy fires.
Well, about a month ago, I finally got my brick wood-burning fireplace.
 So with a little help from Peyton, I painted all those bricks white.
 Painting brick isn’t much harder than painting a wall, it’s just a little more time consuming to get into all those cracks and in the mortar. Before painting, I removed the gold and black glass door insert. Then I used a vacuum cleaner hose to vacuum up all the dust and soot that had accumulated on the bricks. After that, I gave all the bricks a good wipe down with a damp rag and I used wall putty to patch up any holes.
For the paint, I went with Behr’s off-the-shelf white paint in semi-gloss.
Painting brick isn’t much harder than painting a wall, it’s just a little more time consuming to get into all those cracks and in the mortar. Before painting, I removed the gold and black glass door insert. Then I used a vacuum cleaner hose to vacuum up all the dust and soot that had accumulated on the bricks. After that, I gave all the bricks a good wipe down with a damp rag and I used wall putty to patch up any holes.
For the paint, I went with Behr’s off-the-shelf white paint in semi-gloss.
 Originally, I didn’t intend to put the glass doors back into the fireplace. The doors were dated and I didn’t want it ruining the look of my fresh and clean white fireplace.
If you didn’t notice the gold and black doors, here’s a reminder picture for you.
Originally, I didn’t intend to put the glass doors back into the fireplace. The doors were dated and I didn’t want it ruining the look of my fresh and clean white fireplace.
If you didn’t notice the gold and black doors, here’s a reminder picture for you.
 But after leaving the doors off for a few days, we noticed that the room was much colder and it always smelled smoky. Tim was also concerned that a spark could jump out of the fireplace and burn the house to smithereens. So I was finally convinced that we needed the ugly doors back on.
But since I couldn’t handle the gold and black, I decided to give the fireplace insert a makeover so that I could live with her.
All it took was a can of Rustoleum’s Oil Rubbed Bronze metallic spray paint.
But after leaving the doors off for a few days, we noticed that the room was much colder and it always smelled smoky. Tim was also concerned that a spark could jump out of the fireplace and burn the house to smithereens. So I was finally convinced that we needed the ugly doors back on.
But since I couldn’t handle the gold and black, I decided to give the fireplace insert a makeover so that I could live with her.
All it took was a can of Rustoleum’s Oil Rubbed Bronze metallic spray paint.
 First, I gave the whole thing (except the glass part) a quick sanding with a sanding block. This was both to rough up the finish so the spray paint would bond with the metal and also to remove some rust along the edges and corners. Then I used a damp rag to wipe it all down.
After that, I used painter’s tape to tape all around the edges of the glass. This was to make sure that my spray painted edges would be nice and straight.
First, I gave the whole thing (except the glass part) a quick sanding with a sanding block. This was both to rough up the finish so the spray paint would bond with the metal and also to remove some rust along the edges and corners. Then I used a damp rag to wipe it all down.
After that, I used painter’s tape to tape all around the edges of the glass. This was to make sure that my spray painted edges would be nice and straight.
 And then I covered all the exposed areas of the glass with scrap paper, making sure to tape it down well enough that paint couldn’t get up under the edges of the paper and onto the glass. Spray paint is sneaky like that, so you have to be careful.
 Oh, and I also kept the doors slightly propped open so that the spray paint could get all down in between the door cracks and around the edges of the tops and bottoms of the doors. I didn’t want any gold peeking through later when we opened the doors.
Several thin and even coats of spray paint later, I was done. (A spray painting tip : keep your arm sweeping back and forth continuously and spray from about 8 – 10 inches away. If you stop moving your arm or get too close while you’re spraying, you will get drips.)
Oh, and I also kept the doors slightly propped open so that the spray paint could get all down in between the door cracks and around the edges of the tops and bottoms of the doors. I didn’t want any gold peeking through later when we opened the doors.
Several thin and even coats of spray paint later, I was done. (A spray painting tip : keep your arm sweeping back and forth continuously and spray from about 8 – 10 inches away. If you stop moving your arm or get too close while you’re spraying, you will get drips.)
 So much better. Don’tcha think?


I’m back with the part one of what’s looking like it’s going to be a very long kitchen saga.
When we first bought our house, we thought we would be able get away with just giving the kitchen a little facelift – fresh paint, new countertops, a farmhouse sink and a new floor. Nothing too major.
But, after living in this kitchen for a few weeks and even getting partway into the process of reviving it, we’ve come to the conclusion that salvaging our kitchen just isn’t going to work. It’s looking like we’re gonna have to do a complete kitchen renovation.
Here’s the rundown:
From a distance, this side of the kitchen doesn’t seem too bad. I mean, it’s not pretty, but the basic layout is workable.
 And if you use your imagination a little (or a lot), it could even look like this one day.
 But then, it you look a little bit closer, and peek into the inside of the cabinets, you will see the old, stained, water damaged cabinet bottoms.…. not good. Kinda gross! (I’m not even going to mention those nasty linoleum floors yet…that’s for another day.)
 And if you looked closely at the outside of the cabinets, you would also notice that some of the side-by-side cabinet doors aren’t quite the same size and that the drawers are a bit crooked.
But just for fun, let’s assume we can either replace the gross cabinet bottoms or cover them somehow and let’s optimistically think of the drawers and doors as having lots of character and let’s continue on with trying to save this kitchen. Cause that’s what we did. For a while anyway.
So you may remember that I already tore the wallpaper down. And then the other day, I removed the four middle cabinet doors to get an idea of what it would look like with open shelves.
And if you looked closely at the outside of the cabinets, you would also notice that some of the side-by-side cabinet doors aren’t quite the same size and that the drawers are a bit crooked.
But just for fun, let’s assume we can either replace the gross cabinet bottoms or cover them somehow and let’s optimistically think of the drawers and doors as having lots of character and let’s continue on with trying to save this kitchen. Cause that’s what we did. For a while anyway.
So you may remember that I already tore the wallpaper down. And then the other day, I removed the four middle cabinet doors to get an idea of what it would look like with open shelves.
 So the next issue I faced was that all the top shelves were lined with very old, very stuck on shelf liner. And since I wanted to leave those cabinet doors off and I planned to paint the inside of them, the liner had to be removed.
 So here’s a quick tip for anyone that may find themselves in a similar situation of trying to remove old contact paper
.
Don’t try to scrape it all off with a razor blade. It takes fooooreeeever, it’s a major pain, and it doesn’t work.
 I eventually got frustrated that all my efforts were basically getting me fast to nowheresville, so I finally googled “how to remove contact paper.” Should have done that first.
And I found out that a much much much simpler and faster way to remove it is to get a hair dryer and heat up the shelf liner (which heats up the adhesive and loosens it) and then it pulls right up in one big piece. Like so.
I eventually got frustrated that all my efforts were basically getting me fast to nowheresville, so I finally googled “how to remove contact paper.” Should have done that first.
And I found out that a much much much simpler and faster way to remove it is to get a hair dryer and heat up the shelf liner (which heats up the adhesive and loosens it) and then it pulls right up in one big piece. Like so.
 Work smarter, not harder.
After getting all the cabinets free of shelf liner, I cleaned them up (Goo be Gone gets rid of any leftover stickiness) and then started removing all the doors so we could sand and paint them. Tyson likes to unscrew things, so he helped a lot.
Work smarter, not harder.
After getting all the cabinets free of shelf liner, I cleaned them up (Goo be Gone gets rid of any leftover stickiness) and then started removing all the doors so we could sand and paint them. Tyson likes to unscrew things, so he helped a lot.
 Kitchen disaster.
 Now here’s the other side of the kitchen. This was the main problem area; the part that defeated us.
 The first problem is that teeny tiny built-in wall oven. We quickly realized that that oven is not going to work for our family. (My cookie sheets don’t even fit in it.) I could get by for a little while, but it’s just way too small to cook family sized meals in, especially one with growing boys. I foresee lots of big meals in my future and we definitely want this kitchen to last. But we can’t replace the wall oven with anything larger because of the size of the cabinet it has to fit inside. So that’s a major problem. We thought about removing the wall oven, adding shelves, and then trying to somehow cover the leftover gaping hole with cabinet doors. (Another issue with our kitchen is that there is no pantry and really not much cabinet space either, so the extra storage would be helpful.) We also considered cutting the cabinet into a top and bottom cabinet, which would then give us more counter space. But we never figured out exactly how we could do either of those things (with our knowledge and skill level) and do them in a way that would look good and that we would be happy with in the long run.
And if we did remove that built-in wall oven, then of course I would need an oven to replace it.
We actually bought this one from Ikea because I loved it so much and want it in my kitchen.
But in order for this oven (or any oven for that matter), to fit into our kitchen we would have to somehow cut out and remove the part of the cabinets where the gas range top currently sits and then slide this one in there instead. Our little kitchen facelift all of a sudden started to seem more like major reconstructive surgery. So many problems and no real solutions (at least none that our brains could come up with). And by trying to solve one problem we were just creating another problem to be solved. As we sat there staring at our torn apart kitchen one night, we started realizing that it was pretty much beyond saving. And we knew that even if we could figure out a way to cut and slice and rearrange all the kitchen cabinets to fit, there was a good chance that in the end, it would look completely wonky and still not meet our needs. And so we decided we didn’t want to waste any money trying to save an inadequate and inefficient kitchen that would never be what we wanted and needed it to be.
So this entire kitchen must go (except the fridge) and we are going to start completely from scratch. I never planned on a complete kitchen renovation. It’s overwhelming to say the least, but a tad exciting too. We’ve been doing lots of online research and also setting up appointments with kitchen renovation companies to get initial estimates. So far, we’ve gotten one estimate back from a custom cabinet maker at $19,000-$20,000!! Wo-ah! Waaay above our budget.
That number practically sent us running straight into the arms of Ikea. And the more I’ve researched kitchen renovations and cabinets, people really seem to love their Ikea kitchens. And even kitchen designers love to use them in their clients’ homes too. Do any of you know anything about Ikea kitchens? Ever had one? Ever designed one? Any suggestions or advice for someone beginning the process of designing an Ikea kitchen? Help me!
I’ve been using Ikea’s online kitchen planner, but I’m not real confident in my designing abilities at this point. I feel like I could easily be overlooking something major and not even realize it until it’s too late.
This morning, we went to Ikea to really look at their cabinets and get some help from a sales rep in the designing process and I feel a little more at ease about the whole thing. A little, but not a lot. It’s still overwhelming.
The first problem is that teeny tiny built-in wall oven. We quickly realized that that oven is not going to work for our family. (My cookie sheets don’t even fit in it.) I could get by for a little while, but it’s just way too small to cook family sized meals in, especially one with growing boys. I foresee lots of big meals in my future and we definitely want this kitchen to last. But we can’t replace the wall oven with anything larger because of the size of the cabinet it has to fit inside. So that’s a major problem. We thought about removing the wall oven, adding shelves, and then trying to somehow cover the leftover gaping hole with cabinet doors. (Another issue with our kitchen is that there is no pantry and really not much cabinet space either, so the extra storage would be helpful.) We also considered cutting the cabinet into a top and bottom cabinet, which would then give us more counter space. But we never figured out exactly how we could do either of those things (with our knowledge and skill level) and do them in a way that would look good and that we would be happy with in the long run.
And if we did remove that built-in wall oven, then of course I would need an oven to replace it.
We actually bought this one from Ikea because I loved it so much and want it in my kitchen.
But in order for this oven (or any oven for that matter), to fit into our kitchen we would have to somehow cut out and remove the part of the cabinets where the gas range top currently sits and then slide this one in there instead. Our little kitchen facelift all of a sudden started to seem more like major reconstructive surgery. So many problems and no real solutions (at least none that our brains could come up with). And by trying to solve one problem we were just creating another problem to be solved. As we sat there staring at our torn apart kitchen one night, we started realizing that it was pretty much beyond saving. And we knew that even if we could figure out a way to cut and slice and rearrange all the kitchen cabinets to fit, there was a good chance that in the end, it would look completely wonky and still not meet our needs. And so we decided we didn’t want to waste any money trying to save an inadequate and inefficient kitchen that would never be what we wanted and needed it to be.
So this entire kitchen must go (except the fridge) and we are going to start completely from scratch. I never planned on a complete kitchen renovation. It’s overwhelming to say the least, but a tad exciting too. We’ve been doing lots of online research and also setting up appointments with kitchen renovation companies to get initial estimates. So far, we’ve gotten one estimate back from a custom cabinet maker at $19,000-$20,000!! Wo-ah! Waaay above our budget.
That number practically sent us running straight into the arms of Ikea. And the more I’ve researched kitchen renovations and cabinets, people really seem to love their Ikea kitchens. And even kitchen designers love to use them in their clients’ homes too. Do any of you know anything about Ikea kitchens? Ever had one? Ever designed one? Any suggestions or advice for someone beginning the process of designing an Ikea kitchen? Help me!
I’ve been using Ikea’s online kitchen planner, but I’m not real confident in my designing abilities at this point. I feel like I could easily be overlooking something major and not even realize it until it’s too late.
This morning, we went to Ikea to really look at their cabinets and get some help from a sales rep in the designing process and I feel a little more at ease about the whole thing. A little, but not a lot. It’s still overwhelming.
 So here we go into our first real house renovating adventure! I hope you’ll come along for the ride!


